Here collect 9 frequently asked questions for Autel OTOFIX Tools. As a new and young brand powered by Autel, following FAQs can be an OTOFIX products quick guide for beginners.
Autel OTOFIX is coming soon! Following tools support to pre-order now!
• OTOFIX IM1 All-In-One Key Programmer
• OTOFIX BT1 Lite Battery & Electrical System Analyzer
• OTOFIX BT1 Battery Tester

1. How to get started with the tool?
• Insert the V1 into the OBDII port, which is generally located under the vehicle dashboard.
• Long press the Lock/Power button to power up the OTOFIX Diagnostic Tablet. Ensure the diagnostic tablet has a charged battery or is connected to the DC power supply.
• Pair up the diagnostic tablet with the V1 via Bluetooth to establish a communication link.
NOTE: The diagnostic tablet and the V1 are configured to automatically synchronize with each other on first use, so there is no need to pair up.
• When the V1 is properly connected to the vehicle and diagnostic tablet, the VCI status button at the bottom bar on the screen displays a green BT icon. This indicates your diagnostic tablet is ready to start vehicle diagnosis.
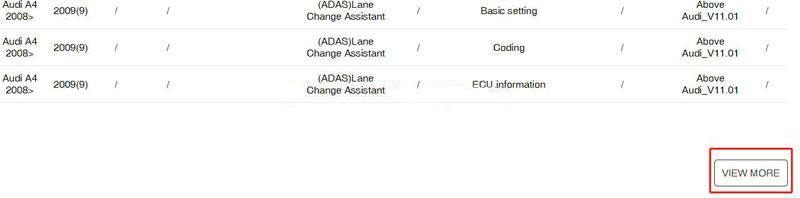
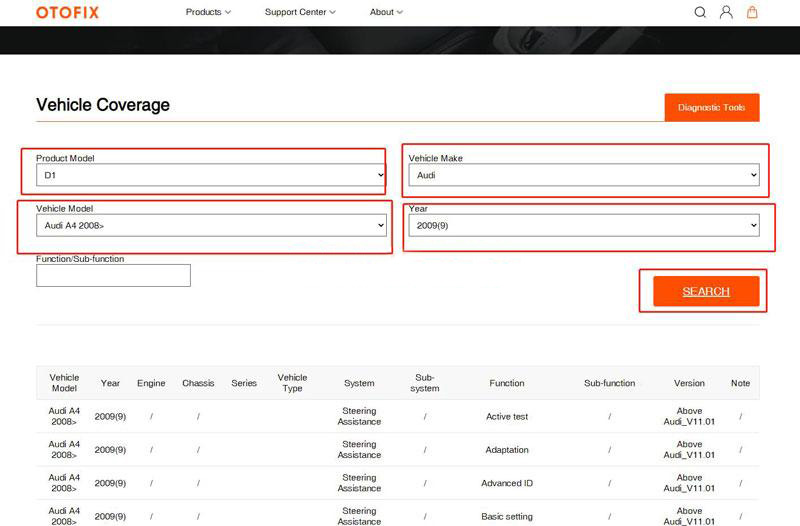
2. How to check vehicle and function coverage?
• Go to the website https://www.otofixtech.com/vehicle-coverage/coverage2
• Select the product and vehicle information;
• Click “SEARCH” and “VIEW MORE”;
3. How to renew subscription?
There are 4 ways to renew the subscription.
• Log into “Update” and click “Renew” on top right, then select Payment methods and finish the payment.
• Go to the website https://pro.autel.com/ and sign in with your Autel ID, then refer to payment instruction at the left-hand side and try.
• Pay dealer to buy update.
• Buy update card from com or other dealers, go to https://pro.autel.com/ and sign in with your Autel ID, then go to redeem and try.
4. How to feedback problems?
When feedback the problems, the following information needs to be provided:
• The serial number of the OTOFIX tool, which you can see it on the back of the tool or on the “Settings-About” page of the tool.
• A video of the whole process or a screenshot of the error message.
• If encounter problems when using the device to perform functions, you need to provide the vehicle make, year, VIN and engine model. Also need to upload data log for analyzing. You can get data logging instructions from here
• If the device has a system problem, such as crashing, unable to download software, etc., you need to go to “MaxiTools — Log Collection — Start — Upload” to upload the system log for analyzing.
5. How to get data log if it can’t be uploaded from MaxiTools or Data Log menu?
• Can not be uploaded from MaxiTools (Take OTOFIX D1 as example)
• Connect the device to a computer;
• Go to “OTOFIX D1 —- ES File Explorer —– sdcard —- AppLog”, then you will see the data file.
• Long press the file and tap the “More” icon on the right corner, then select “Compress”.
• Copy the ZIP file on computer.
• Send the file to Autel tech support via email.
• Can not be uploaded from Data Log menu (Take OTOFIX D1 as example)
• Connect the device to a computer;
• Go to “OTOFIX D1 —- ES File Explorer —- Scan —- Datalogging”;
• Select vehicle software, then you will see the data file;
• Long press the file icon, then copy it on the computer.
• Send the file to Autel tech support via email.
6. What if there is a communication failure with a specific module (other modules are communicating well)?
• Check if there are any problems, especially connection issues, in this module itself or not;
• Check if there are any related issues/error codes in any other related modules or not;If yes, fixed the related errors first;
• Still any errors please advise details and record a video to show your diagnostic process.
7. What if there is a communication failure with all modules?
• Check if OBDII cable is fine/change another cable to try again;
• Check if OBDII function is communicating fine;
• Check if there are any issues in vehicle itself or not;
• Check if any other vehicles have the same issue or not; If all vehicles are not communicating, please try another new OBDII cable.
• If this vehicle is not communicating only, please check problems on the vehicle itself first.
8. Got “Linking Error” message when using OBDII software?
• Check if the vehicle testing is OBDII compliant or not (EOBD or JOBD is not supported);
• Vehicles adopted OBDII system in different regions around the world (For Reference):
– Europe: Adopted OBDII system since 2006;
– U.S.A: Adopted OBDII system since 1996;
– Asia: Adopted OBDII system since 2009;
• Check if any other OBDII compliant vehicles(US vehicles, Ford, GM, Chrysler are suggested) are communicating with this scanner or not; If other vehicles are communicating fine, it is most likely that the vehicle you testing is NOT OBDII compliant;
• If it is confirmed that the vehicle is OBDII complaint but still linking error, please advise your region/country, screenshot of About information of your device, VIN of your vehicle to our tech support.
9. How to print from the tablet to a network printer via a computer?
• Setup a printer connection
• Tap “Settings” on the OTOFIX Job Menu.
• Tap “Printing Settings” on the left column.
• Tap “Print” via network to activate the printing function, which enables the device to send files to the printer through the PC via Wi-Fi connection.
• Tap “Home” on the top-left corner to return to the OTOFIX Job Menu, or select another setting option for further system setup.
• Install the MaxiSys Printer driver
• Download Maxi PC Suite from “otofixtech.com > Support Center > Downloads > OTOFIX Update Tools”, and install to your Windows-based PC.
• Double-click on “Setup.exe”.
• Select an installation language to launch the installation wizard.
• Follow the instructions on the screen and click on “Next” to continue.
• Click “Install” and the printer driver will be installed on to the computer.
• Click “Finish” to complete the installation.
• Print from a computer
• Make sure the tablet is connected to the computer network via Wi-Fi or LAN before printing.
• Run the “MaxiSys Printer” program on the computer.
• Click “Test Print” to check whether the printer works properly.
• Tap the “Print” button on the toolbar of the tablet. A test document will be sent to the computer.
NOTE:
If the Auto Print option in the MaxiSys Printer is selected, the MaxiSys printer will automatically print the received document.
If the Auto Print option in the MaxiSys Printer is not selected, click the “Open PDF File” button to view files. Select the file(s) to be printed and click “Print”.