
Xentry Openshell XDOS Windows 10 installation tips and guides for newbies:
– XDOS Windows 10 Startkey not valid
– XDOS Windows 10 security settings
– No Windows 7 VMware on Windows 10
– Windows 10 Ad-Hoc Fix
– Ad-Hoc connection on Windows 10
– Sdconnect C4 Wifi connection on Window 10
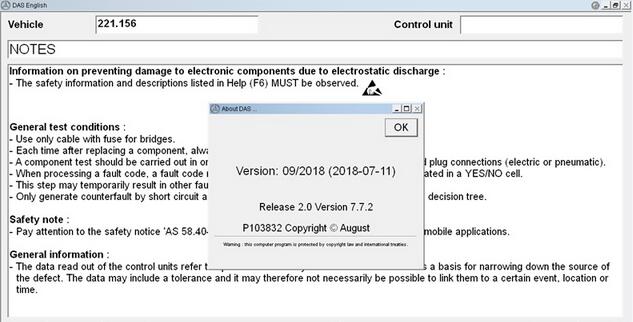
– 09.2018 XDOS Windows 10 reliable source

In detail…
(Note that all solutions here are based on personal experience and you can have a try as you want, but no one will hold responsibilities of what will happen to your tool and car. Good luck!)
1. XDOS Windows 10 Startkey not valid
I have strange problem with XDOS version on Win 10 x64: In ConfigAssist I can’t enter Xentry key – “StartKey not valid error”
I try to use standalone key center but see 0x8000704C7 error when I start it.
For Win10x64, it is one of the recommended system requirements by Mercedes. but maybe there is some obstacle(s) but a member wrote in this thread that he could handle it as well.
Xentry xdos: xentry diagnosis for 12/24v using partd aka C3 (obsolete), sdconnect aka C4, ecom, xentry connect aka xentry kit 2, and bosch vci aka xentry kit 3
Xentry passthru EU or USA: xentry diagnosis using J2534 passthru devices e.g: mercedes passthru vci (12/24v), avdi, vas5054a (12v), drewtech MongoosePro (12/24v) and many other J2534 compatible devices.
2. XDOS Windows 10 security settings
I have enough problems with w10 and security settings I just used w7 x86 ultimate went thru no problems did all my addones 1st took some time but , for some reason no taskbar icom for connection setup but can manually open .
if you install xentry passthru, it will not install sdconnect toolkit.
but if you install xentry xdos, the sdconnect toolkit will be installed.
you can set to ‘show’ in the taskbar tray at right bottom corner.
3. No Windows 7 VMware on Windows 10
Are you booting into a Win7 VM or some sort of Win7 image on your Win10 laptop?
No VMware no win 7 image. It working on Windows 10 64bit professional. The same Ad-hoc like on Win 7. WEP is not problem. You have to manually set new connection with name Road24h/WEP/key uncheck automatic connection or something like this /I forgot/ then use solution which posted Mr.Rocinante and allow Ad-hoc thats all. This working for me. You can see on picture in my post how is connected SDConnect. I tested it on 3 cars and no problem with Ad-hoc. I reinstall full system now because I found one larger hdd
4. Windows 10 Ad-Hoc Fix
On win 10 will be hard as hosted networks on win 10 not accept wep anymore
This is how I fixed the Win10 Ad-Hoc, wireless SDconnect C4 connection issue.
I downloaded the Win 8.1 wireless adapter drivers for my specific wireless card.
Download ONLY the drivers, not the software suite with the driver.
The Win 8.1 drivers will allow Ad-Hoc to function under Win 10.
I deleted/uninstalled my wireless adapter card to remove all current drivers associated with this wireless adapter.
I double clicked the .exe driver file for Win 8.1. The software found my wireless adapter and installed the Win 8.1 drivers.
Rebooted system, Ad-Hoc functions properly now.
Hope this works for others using Win 10.
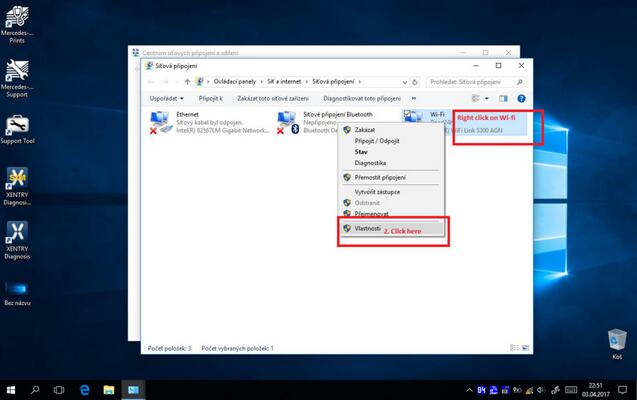
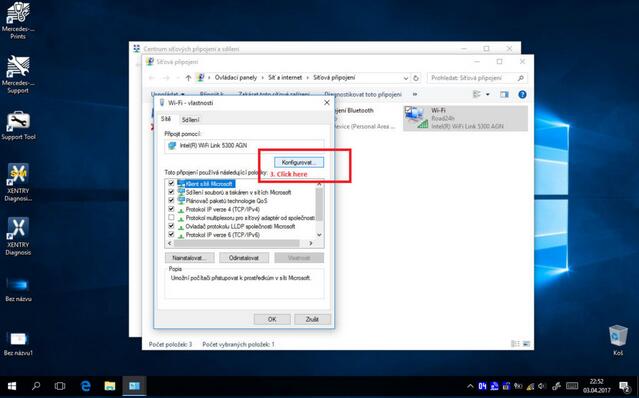
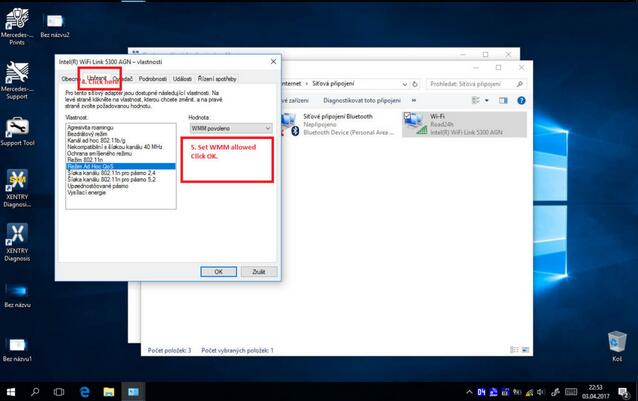
5. Ad-Hoc connection on Windows 10
There seems a problem between Ad-hoc and win 10?
This solution working but also need to be allowed Ad-hoc.
On the pictures you can see adhoc connection on win 10. You need settings from thread “sdconnect xdos configuration” you need set up new connection Road24h with wep encryption and allow adhoc that’s all.
1. Sdconnect C4 Wifi connection on Window 10
Can somebody help me with wifi connection C4 and win 10
It worked for me
To save an ad-hoc network and its network key on the guest computer (running Windows 7)
Note down the SSID, security type, encryption type and the key of the ad-hoc network.
Disconnect your connection to any wireless network and switch off/disable your wireless device. Turn on/enable your wireless device but don’t connect to any network. (Thanks GK.)
Click on the network icon in the taskbar.
Click Open Network and Sharing Center > Manage Wireless Networks > Add.
Click “Manually create a network profile”. (This may look silly but we really are going to create an infrastructure network now.)
Enter the network name (SSID), security type, encryption type (if any) and the key that you noted in step 1.
Uncheck both checkboxes (“Start this connection automatically” and “Connect even if the network is not broadcasting”.) [Note that you cannot have the connection start automatically. If you try to have it checked, step 10 will fail. A different way to start it automatically during system boot is described below.]
Click Next > Close. Your connection must appear in the list with the icon suggesting infrastructure (two big screens connected to a tube). Don’t worry about it.
Click Start, type in “cmd” in the search box, press Enter.
In the Command Prompt, type in “netsh wlan set profileparameter name=NetworkName ConnectionType=IBSS”, exactly as shown, without quotes, except you must substitute NetworkName with the SSID (network name) of your ad-hoc network.
If everything went well, you’ll see that the icon has now changed to an ad-hoc icon (three small screens connected to each other) in the Manage Wireless Networks window.
Turn on/enable your wireless device, and try connecting to the Ad-hoc network. You will notice that you no longer need to enter the network key.
To automatically connect to a saved ad-hoc network during Windows boot (can be applied to both guest and host computers running Windows 7)
Click Start > point to All Programs > right-click Startup > click Open. (You may choose Open All Users instead if you prefer).
Right-click an empty space and click New > Shortcut.
Type in “netsh wlan connect NetworkName”. Once again, NetworkName must be substituted with the SSID of your ad-hoc network.
Click Next and enter a fancy name such as “Connect to NetworkName” or something like that.
Click Finish and you’re done. This shortcut will run when Windows starts up, giving you a very brief flash of the black command window, followed by your computer connecting to the ad-hoc network if it is available. Tip: You can also pin the shortcut in your taskbar or copy it to the desktop to easily connect to the network any time you want.
Note: You will probably need Administrator access to complete some of the steps above (in both procedures).
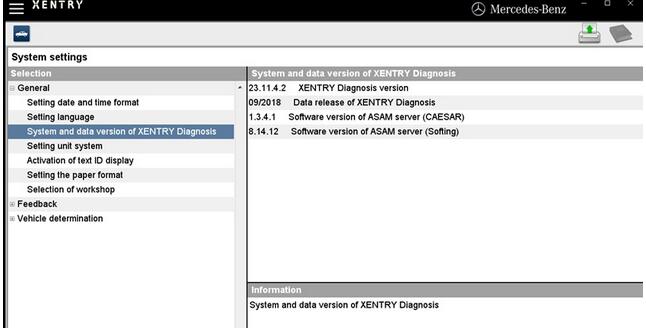
2. 2018 XDOS Windows 10 reliable source
Do you have any reliable link for 09.2018 Xentry? Better have been confirmed to work no issues with SDconnect?
I’m using the site https://www.obd2tool.com/goods-2890-MB+SD+Compact+4+Update+to+Latest+version+201605.html good tech support. Free activation help via remote
Upload images…


No related posts.