WF51 – Re-coding Instrument Cluster (Workshop Campaign)
Important: CRITICAL WARNING – This campaign includes steps where control unit(s) in the vehicle will be
programmed with the PIWIS Tester. The vehicle voltage must be maintained between 13.5 volts and 14.5
volts during this programming. Failure to maintain this voltage could result in damaged control unit(s). Damage caused by inadequate voltage during programming is not a warrantable defect. The technician
must verify the actual vehicle voltage in the PIWIS Tester before starting the campaign and also document the actual voltage on the repair order. Please refer to Equipment Information EQ1401 for a list of suitable battery chargers/power supplies which should be used to maintain vehicle voltage.
Model Year: 2015
Vehicle Type: Cayenne S E-Hybrid (92A)
Concerns: Instrument cluster
Information: The instrument cluster on the affected vehiclesmay have been coded using an incorrect
coding rule. As a result, there is a possibility that the range on remaining fuel will be calculated incorrectly and an incorrect range will be shown on the display when driving extensively at full load.
The fuel-level indicator always shows the correct level.
Action Required: Re-code instrument cluster.
Affected Vehicles: The VIN(s) can be checked by using PIWIS Vehicle Information link to verify if the campaign affects the vehicle. This campaign is scope specific to the VIN! Failure to verify in PIWIS may result in an improper repair. This campaign affects 160 vehicles in North America.
Tools:
* 9818 – Porsche Piwis Tester with PIWIS Tester test software version 15.700 (or higher) installed.
* Battery Charger/Power Supply – Suitable for AGM Type batteries, recommended current rating of
70A fixed voltage 13.5V to 14.5V. Refer to Equipment Information EQ-1105.
Claim Submission: See Attachment “A”.
Preliminary work
NOTICE
* Coding will be aborted in the event of low voltage.
* Increased current draw during diagnosis can cause a drop in voltage, which can result in one ormore fault entries and the abnormal termination of the coding process.
* Before getting started, connect a suitable battery charger with a current rating of at least 70 A to the jump-start terminals in the engine compartment.
NOTICE
Coding will be aborted if the Internet connection is unstable.
* An unstable Internet connection can interrupt communication between PIWIS Tester II and the vehicle
communication module (VCI). As a result, coding may be aborted.
* During control unit programming, always connect PIWIS Tester II to the vehicle communicationmodule
(VCI) via the USB cable.
1 Connect Battery Charger/Power Supply – Suitable for AGM Type batteries, recommended current
rating of 70A fixed voltage 13.5V to 14.5V. Refer to Equipment Information EQ-1105.
2 9818 – PIWIS Tester II must be connected to the vehicle communication module (VCI) via the USB
cable. Then connect the communication module to the vehicle and switch on the PIWIS Tester.
3 On the PIWIS Tester start screen, call up the ? ‘Diagnostics’ menu and select the vehicle type ?
‘Cayenne’ ? ’92A’.
The diagnostic application is then started and the control unit selection screen is populated.
Re-coding instrument cluster
Information
The procedure described here is based on the Professional Diagnostic Tool PIWIS Tester II software version 15.700.
The PIWIS Tester instructions take precedence and in the event of a discrepancy, these the instructions that must be followed.
A discrepancy may arise with later software versions for example.
Work Procedure:
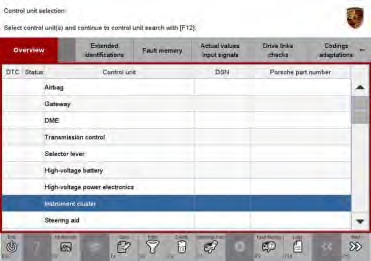
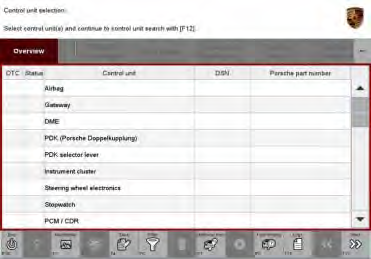
1 Select ? ‘Instrument cluster’ in the control unit selection screen (? ‘Overview’ menu) and press ?>>“ to confirm your selection => Control unit selection – Instrument cluster.
2 When the question “Create Vehicle Analysis Log (VAL)?” appears, either press ?F12“to create a VAL
or press ?F11“ if you do not want to create a VAL.
3 Press?>>“ to acknowledge the message informing you that campaigns for the vehicle are stored in the
PIWIS information system.
4 Once the instrument cluster has been found and is displayed in the overview, select the ?
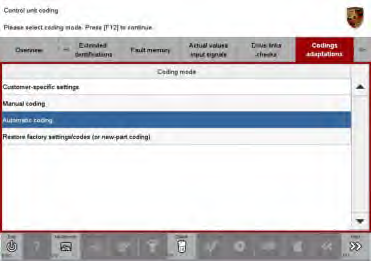
‘Codings/adaptations’ menu.Instrument cluster – Automatic coding
5 Select the ? ‘Automatic coding’ function and press ?>>“ to start coding?
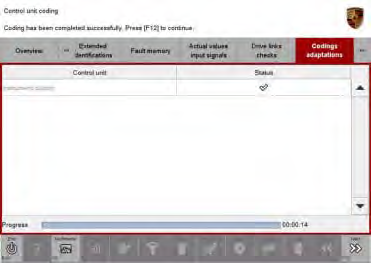
6 When coding is complete, the message “Coding has been completed successfully” is displayed and a tick appears in the ‘Status’ box ? Coding successful. If coding is not completed successfully (error
message “Coding was not completed successfully”),coding must be repeated.
7 Once coding has been completed successfully, press ?>>“ to return to the start page of the ?
‘Codings/adaptations’ menu.
8 Select the ? ‘Overview’ menu and press ?<<“ to return to the control unit selection screen.
Reading out and erasing faultmemories
WorkProcedure:
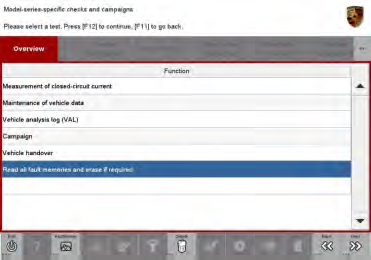
1 In the control unit selection screen (? ‘Overview’ menu), press ?F7“to call up the Additional menu.
2 Select the function “Read all fault memories and erase if required” and press ?>>“ to confirm
? Erasing fault memories.
The fault memories of the control units are read out.
3 Once you have read out the fault memories, delete the fault memory entries by pressing ?F8“.
4 Press ?F12“ (“Yes”) in response to the question as to whether you really want to erase all fault
memory entries.
The faults stored in the fault memories of the various control units are deleted.
Information
If the faultmemories of individual control units (e.g. faultmemories of the control units DME, Adaptive
Cruise Control (ACC), etc.) cannot be erased, proceed as follows:
* Switch off ignition.
* Disconnect the PIWIS Tester diagnostic connector from the diagnostic socket.
* Lock the vehicle using the driver’s key.
* Wait approx. 1 minute before unlocking the vehicle again.
* Plug the PIWIS Tester diagnostic connector into the diagnostic socket again and restore communication
with the vehicle.
* Read out the fault memories of these control units again and erase the fault memories separately.
If control units are found to have faults that cannot be erased and are not caused by control unit programming, these faults must be found and corrected. This work cannot be invoiced under the workshop campaign number.
5 Once you have erased the fault memories, select the ? ‘Overview’ menu to return to the control unit selection screen => Control unit selection.
Calibrating electric machine
Information
The electric machine must generally be calibrated after the fault memories of the OBD-relevant control
units or the fault memories of all control units have been erased. The rotor position (phase angle) and rotor temperature are stored during calibration of the electric machine.
Work Procedure:
1 Press and hold the brake pedal.
2 Turn the ignition key in the ignition lock to position 2 (terminal 50 – engine start) and hold it at this position for about 2 to 3 seconds. Calibration of the electric machine is clearly audible. Calibration is complete once the calibration noise can no longer be heard.
3 Release the ignition key and move it to position 1 (ignition on).
Subsequent work
Work Procedure:
1 Switch off ignition.
2 Disconnect the PIWIS Tester from the vehicle.
3 Switch off and disconnect the battery charger.
4 Enter the workshop campaign in the Warranty and Maintenance booklet.
Attachment “A”: ClaimSubmission – Workshop CampaignWF51
Warranty claims should be submitted via WWS/PQIS.
Open campaigns may be checked by using either the PIWIS Vehicle Information system or through PQIS
Job Creation.
Labor, parts, and sublet will be automatically inserted when Technician is selected in WWS/PQIS. If
necessary, the required part numbers will need to be manually entered into warranty system by the dealer administrator
Working time:
Re-coding instrument cluster
Includes: Connecting and disconnecting battery charger
Connecting and disconnecting PIWIS Tester
Reading out and erasing fault memories
Calibrating electric machine
Labor time: 19 TU
=> Damage codeWF51 066 000 1
Important