
While the use of the OBD2 on the car has become traditional, what has failed to get to most people is the car OBD 2 installation process. Seeming tedious as it is to so many motorists, it can be one of the easiest things to perform around the car.
How to install an OBD 2 deviceThe OBD 2 is of different nature and the one with most cars is the one to be connected at the OBD 2 port. However, because of its computerized nature, the OBD 2 in essence works with different programs which must in most cases be installed within the car computer system.
Saving yourself the agony of the whole thing may require that you identify the diverse applications which the OBD 2 is compliant. For instance, the torque, the windows and the other several applications including the android installation processes which may precede the Car Scanner.
How to install the OBD 2 on different applications?
As each of the OBD 2 scan tools are made by different manufacturers, they have different compatibility issues. Installing the specific OBD software on the car computer memory is quite important. You may need to follow these steps;
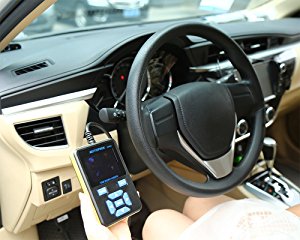
Locate the OBD 2 port-get to know where the Professional Diagnostic Tool is located. This is usually found somewhere below the drivers’ seat. In some older car versions, the dashboard would be better if you checked. After that, you also need to know the type of software t be installed and where. Some of these OBD 2 tools may be installed within the phone through the wireless
Turn on the car engine-if the car is switched off, switching it on may help bring to life the car computer system. Connect the OBD scan tool to be installed and initiate the process by pressing Ok on the keypad. Leaving the car engine on is an important process while installing the OBD 2 device.
Run the device software-The system is bound t run itself on the computer screen, run it and allow it to bring the interface, click add, when prompted to and click ok on the computer screen. At this point, the system is set and ready for use.
Video: How to Install an OBD2 Device – Track Your Mileage, Fuel Costs And More
However, the different applications on the computers may present different interfaces. The windows installation process will require that the user clicks next until prompted to click finish; the system is ready for use.
Choose the interface-If the car key programming to be installed is Bluetooth in nature, what the user needs to know is how to initiate a search for the nearby Bluetooth devices which the computer memory may be detecting. Go to the Bluetooth settings and click, set the wireless network connection and check for the devices which are detected.
When the device pairs on the computer screen, this will then require the user to just click next until the area where the user has the prompt for finish. However, if it is on the phone, select the device to be paired only when notified. This may need to be performed at least twice if the device is of android nature.
Enter password-for security, most of the OBD 2 device software asks for the insertion of a password which is to be used only by the authorized user. For the Bluetooth devices, the pairing code is what is used in most cases.
The user passkey may come with the specific OBD 2 device within the user manual. It calls for the thorough perusal f the manual before use. When the whole installation process is done, the car engine computer is OBD 2 compliant and rearing to go.
Use the OBD 2 device to check the status of your car– the usual user process will take effect by just connecting the device through the LOBD 2 connection port and then getting the readings, or pairing at every instance you wish to use the Bluetooth device.
It is worth noting that the installation of the Car ECU Programmer on the computer is not an end in itself. Some cars have peculiar ways of working and may reject the OBD 2 which you have installed.
This may prompt a new installation process. What is important is that the system needs to be tested at the time of installation before the user rests pretty.